Overview
With the slew of SSL and TLS based vulnerabilities over the last two years F5 administrators have been forced to become more cognizant of the encryption standards used in their environment. While disabling SSLv3 and TLSv1 is a critical step in securing your infrastructure you may find yourself stuck with applications servers that only support TLSv1 or weaker protocols.
HTTPS monitors in TMOS always default to the latest protocol version supported by OpenSSL but when you upgrade to 11.5.0 and higher the HTTPS monitors will not utilize SSLv3 or TLSv1. If you’re stuck with application servers that require TLSv1 this puts you in a sticky situation. Now I don’t know the dynamics of your organization and while upgrading the application server to support a more secure protocol is the ideal way to solve this issue it might not be feasible you for. For those customers the process below outlines the process of creating an external monitor that uses TLSv1 to perform health checks.
Note: this article is based upon TMOS 11.5 and higher. If you’re running another version this process would still work but the step by step instruction may differ for your configuration.
Create an Monitor Script
Grab the HTTP monitor script from CodeShare on DevCentral and modify the curl statement on line 48 from:
curl -fNs http://${IP}:${PORT}${URI} | grep -i "${RECV}" 2>&1 > /dev/null
to
curl -NksSf --tlsv1 https://${IP}:${PORT}${URI} | grep -i "${RECV}" 2>&1 > /dev/null
Save the modified script to your desktop and upload the script to your BIG-IP through the File Management options under the System menu.
Note: I named my monitor tlsv1_monitor which will be referenced throughout this document.
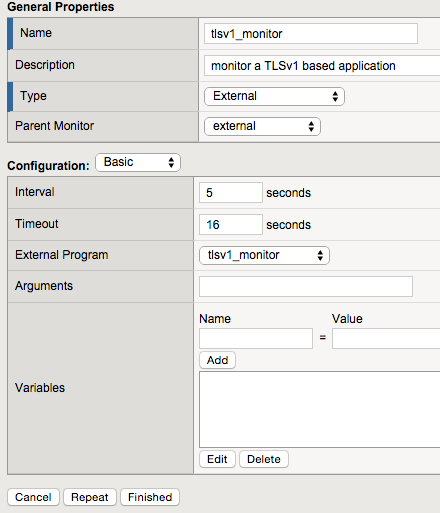
Create an External Monitor
Now we can create an external monitor based upon our monitor script.
- In the left hand menu click Local Traffic -> Monitors
- Click the create button in the top right corner
- Name your monitor (remember you can’t use spaces in the name)
- Select External for the type
- Select your external monitor for the External Program
- Click Finished
Test Your External Monitor
Now that you’ve created an external monitor based upon your monitor script we need to test it. You could go for broke and assign it to a pool but I prefer to know things are working as intended and not because i goofed up somewhere!
When you upload your monitor script TMOS stores it in the filestore. So to test this script we’ll need to SSH into the BIG-IP and access the BASH console.
Initial Test
Note: TMOS adds a unique identifier to the script name. So your script name will be different than the example below. You’ll also need to enter your own IP address and port for the two script arguments.
- cd /config/filestore/files_d/Common_d/external_monitor_d
- ./\:Common\:tlsv1_monitor_386911_1 10.128.20.11 443
If everything works the script should return UP.
TCPDump
Now that our script is working we need to verify that it’s actually using TLSv1. To determine this we’ll take a tcpdump while issuing the command above and then verify the protocol with the ssldump command.
Note: You’ll need to modify the IP address and TCP port to match your environment.
Type the following commands on the CLI:
- tcpdump -vvv -s0 -nni External -w /var/tmp/tlsv1.cap host 10.128.20.11 and port 443
- ctrl+z
- bg
- ./\:Common\:tlsv1_monitor_386911_1 10.128.20.11 443
- fg
- ctrl+c
This will start a TCP dump and then send the process to the background (ctrl+z pauses and bg sends it to the background). Once the monitor command is executed the fg command will bring the tcpdump process back to the forground and ctrl+c will terminate the tcpdump.
Note: The tcpdump command will still display information to the CLI so you may have a hard time seeing what you’re typing. My recommendation is to paste the monitor script command.
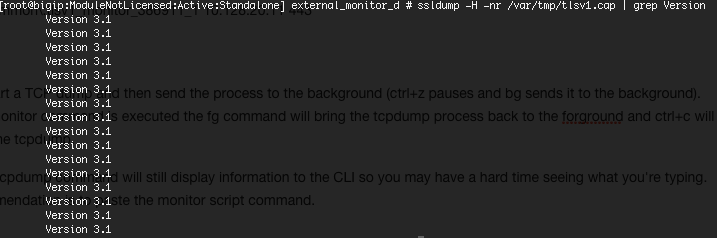
SSLDump
Once you have the tcpdump we can use ssldump to view the protocol used between the F5 and your server. Issue the following commands at your CLI:
- ssldump -H -nr /var/tmp/tlsv1.cap | grep Version
This will display the SSL record messages and search for the Version used. In our case we’re looking for Version 3.1:
Assign your External Monitor
Now that everything is working as intended you can assign the new external monitor to your application pool. If you don’t know how to do this I highly recommend you checkout the DevCentral Whiteboard Wednesday session on monitors.
